---
metadata:
- name: generator
content: Diplodoc Platform v5.57.3
alternate:
- https://boost.yandex.ru/doc/en/ad-monetization/dev/ios7/native.md
- https://boost.yandex.ru/doc/ru/ad-monetization/dev/ios7/native.md
- href: en/ad-monetization/dev/ios7/native.md
type: text/markdown
title: Markdown version
- href: llms.txt
type: text/markdown
title: llms.txt
---
> **Documentation Index:** Fetch the complete configuration index at https://boost.yandex.ru/doc/en/llms.txt
[//]: # (Эта страница переводится также на бразильский португальский — pt-BR)
# Native ads
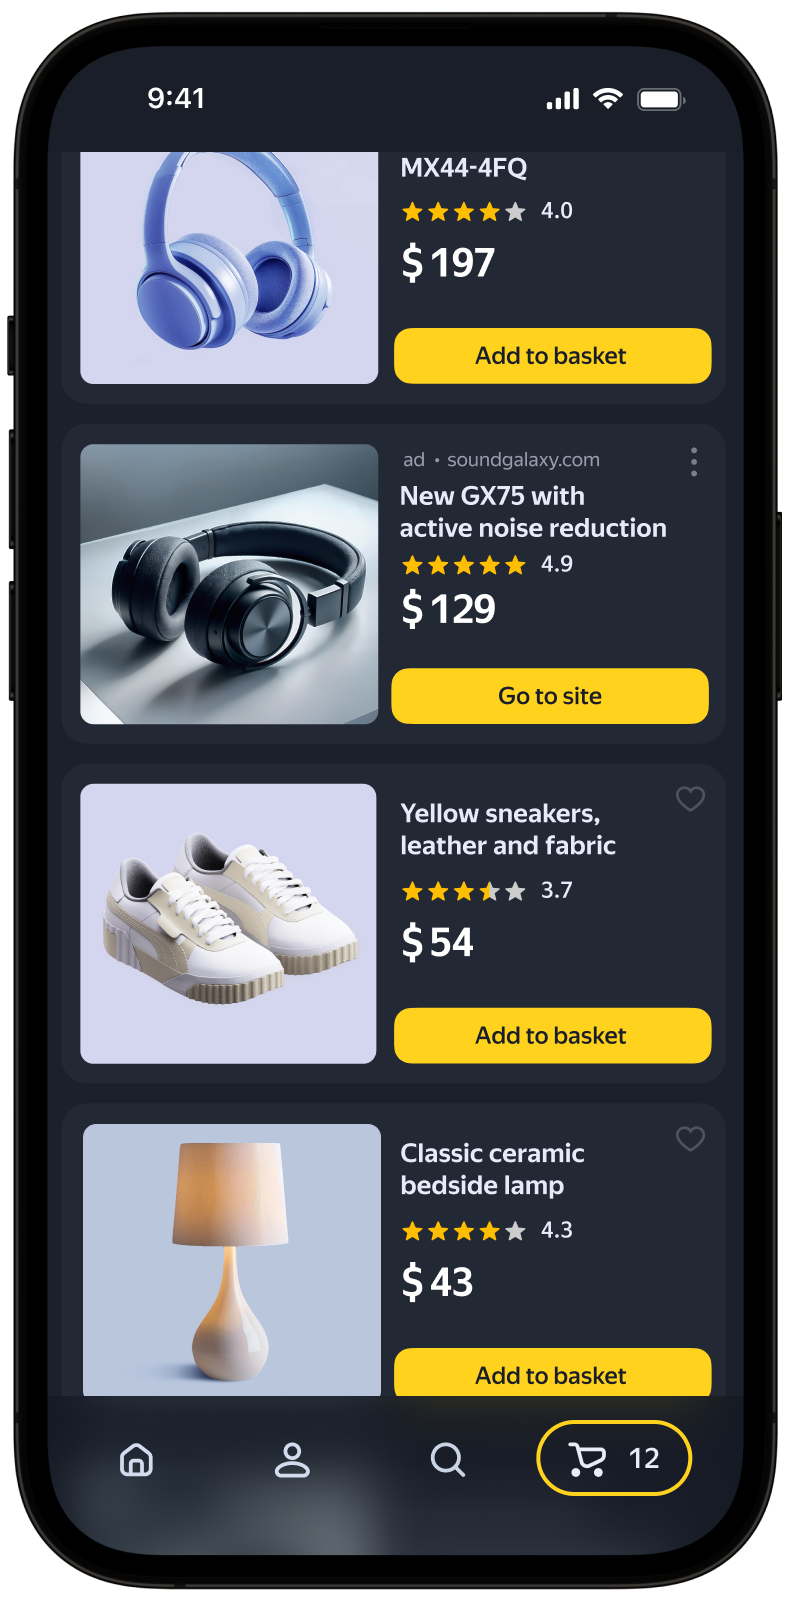
Native advertising is a type of ad whose layout can be defined at the app level. This feature allows you to change the visual style of ads and their placement, in the context of the app design specifics.
Native ads enhance the overall ad experience, so you can show more ads while keeping users engaged. In the long run, this allows you to maximize your advertising revenue.
Ad rendering is performed with native platform tools, which enhances ad performance and quality.
{% cut "Appearance" %}
 {% endcut %}
This guide will show how to integrate native ads into iOS apps. Besides code samples and instructions, it contains format-specific recommendations and links to additional resources.
## Prerequisite {#pre}
1. Follow the SDK integration steps described under [Quick start](https://boost.yandex.ru/doc/en/ad-monetization/dev/ios7/quick-start.md).
2. First, you need to [initialize](https://boost.yandex.ru/doc/en/ad-monetization/dev/ios7/quick-start.md#init) the advertising SDK.
3. Make sure you're using the [latest version of the Yandex Mobile Ads SDK](https://boost.yandex.ru/doc/en/ad-monetization/dev/platforms.md), and if you're using mediation, update to the most recent version of the [unified build](https://boost.yandex.ru/doc/en/ad-monetization/dev/platforms.md).
## Implementation {#implement}
Key steps for integrating native ads:
- Create and configure a `NativeAdLoader`.
- Set up a delegate for the loader and implement the required delegate methods.
- Load the ad.
- Pass [additional settings](https://boost.yandex.ru/doc/en/ad-monetization/dev/ios7/target-adfox.md) if you're using Adfox.
- Render the loaded ad.
## Specifics of native ad integration {#features}
1. All calls to Yandex Mobile Ads SDK methods must be made from the main thread.
2. We strongly advise against attempting to load a new ad when receiving an error in the `func nativeAdLoader(_ loader: NativeAdLoader, didFailLoadingWithError error: Error)` method. If you need to load an ad from `func nativeAdLoader(_ loader: NativeAdLoader, didFailLoadingWithError error: Error)`, restrict ad load retries to avoid recurring failed ad requests due to network connection constraints.
3. We recommend maintaining a strong reference to the ad and its loader throughout the lifespan of the screen where the ad interaction is taking place.
4. The size of the ad container should be based on the ad content.
After the ad has finished loading, you need to render all of its assets. You can get the list of available ad assets from the `NativeAd` advertising object.
5. Ads with a video typically have a higher CTR and, consequently, generate more revenue. To display video ads, the size of the ad container and the MediaView component must be at least 300 × 160 dp (density-independent pixels).
6. We recommend using a layout that includes all the possible components. In practical terms, such layouts result in higher conversion rates.
## Loading ads {#load}
To load your native ads, create a `NativeAdLoader` object.
Ad request parameters are configured using the `NativeAdRequestConfiguration` class object. Be sure to pass the ad unit ID as the request parameter. Additionally, you can configure the image loading method, age, gender attributes, and other data that can make impressions more relevant. To learn more, see [Ad targeting](https://boost.yandex.ru/doc/en/ad-monetization/dev/ios7/target.md).
To receive notifications about ad loading results, implement the `NativeAdLoaderDelegate` protocol and set it as a delegate for the previously created `NativeAdLoader`.
To load an ad, call the `loadAd(with: NativeAdRequestConfiguration)` method.
The following example shows how to load native ads from the View Controller:
```swift
final class CustomNativeViewController: UIViewController {
private var adLoader: NativeAdLoader?
override func viewDidLoad() {
adLoader = NativeAdLoader()
adLoader?.delegate = self
}
private func loadNativeAd() {
let requestConfiguration = NativeAdRequestConfiguration(adUnitID: "R-M-XXXXX-YY")
adLoader?.loadAd(with: requestConfiguration)
}
}
extension CustomNativeViewController: NativeAdLoaderDelegate {
func nativeAdLoader(_ loader: NativeAdLoader, didLoad ad: NativeAd) {
// Notifies that a native ad is loaded
}
func nativeAdLoader(_ loader: NativeAdLoader, didFailLoadingWithError error: Error) {
// Notifies that the ad failed to load
}
}
```
## Rendering ads {#ad-view}
After the ad has finished loading, you need to render all of its assets. You can get the list of available ad assets from the `NativeAd` advertising object.
There are two ways to configure the layout of an ad:
- Template-based layout.
- Manual configuration of the native ad layout.
### Layout using a template {#with-template}
The standard template layout is the simplest way to work with native ads, and you'll only need a few lines of code to set up the basic variant.
The template already includes a full set of necessary ad assets and defines their relative placement. The template is compatible with any supported type of native ads.
```swift
final class NativeTemplateViewController: UIViewController, NativeAdDelegate {
private let adView = NativeBannerView()
// ...
private lazy var adLoader: NativeAdLoader = {
let adLoader = NativeAdLoader()
adLoader.delegate = self
return adLoader
}()
override func viewDidLoad() {
setupUI()
loadNativeAd()
}
private func loadNativeAd() {
let requestConfiguration = NativeAdRequestConfiguration(adUnitID: "demo-native-content-yandex")
adLoader.loadAd(with: requestConfiguration)
}
private func bindNativeAd(_ ad: NativeAd) {
ad.delegate = self
adView.ad = ad
}
private func setupUI() {
// ...
}
}
extension NativeTemplateViewController: NativeAdLoaderDelegate {
func nativeAdLoader(_ loader: NativeAdLoader, didLoad ad: NativeAd) {
bindNativeAd(ad)
}
func nativeAdLoader(_ loader: NativeAdLoader, didFailLoadingWithError error: Error) {
// ...
}
}
```
The native ad template can be customized. To learn more about this, see [Setting up the layout using a template](https://boost.yandex.ru/doc/en/ad-monetization/dev/ios7/template.md).
### Manual configuration of the native ad layout {#config}
If the template fails to meet your needs, you can configure the layout of your native ads manually.
This method allows you to create a custom layout for your native ads and define their positioning relative to each other. The ad may include both required and optional assets for display. For the full list, see [Native ad assets](https://boost.yandex.ru/doc/en/ad-monetization/dev/ios7/components.md).
{% note tip %}
We recommend using a layout that includes all the possible components. In practical terms, such layouts result in a higher conversion rate.
{% endnote %}
To manually configure the layout of your native ads:
1. Create a custom `view` for the `YMANativeAdView` class.
1. Set up the positioning of custom elements responsible for asset rendering.
1. Bind these custom elements to the corresponding `YMANativeAdView` properties:
```swift
final class CustomNativeAdView: YMANativeAdView {
// ...
init(){
super.init(frame: CGRect())
setupUI()
bindAssets()
}
private func bindAssets(){
titleLabel = customTitleLabel
domainLabel = customDomainLabel
warningLabel = customWarningLabel
sponsoredLabel = customSponsoredLabel
feedbackButton = customFeedbackButton
callToActionButton = customCallToActionButton
mediaView = customMediaView
priceLabel = customPriceLabel
reviewCountLabel = customReviewCountLabel
ratingView = customRatingView
bodyLabel = customBodyLabel
iconImageView = customIconImageView
}
private func setupUI(){
// ...
}
}
```
{% note info %}
If you don't bind the custom element to the `YMANativeAdView` property for a required asset, the ad won't be displayed.
{% endnote %}
1. Link the custom `view` to the `NativeAd` ad object to display native ads in the `nativeAdLoader(_ loader: NativeAdLoader, didLoad ad: NativeAd)` method of the `NativeAdLoaderDelegate` delegate. To do this, call the `bind(with adView: YMANativeAdView)` method for the `NativeAd` object:
```swift
final class NativeCustomViewController: UIViewController, NativeAdDelegate {
private let adView = NativeCustomAdView()
// ...
private lazy var adLoader: NativeAdLoader ={
let adLoader = NativeAdLoader()
adLoader.delegate = self
return adLoader
}()
override func viewDidLoad(){
super.viewDidLoad()
setupUI()
loadNativeAd()
}
private func loadNativeAd(){
let requestConfiguration = NativeAdRequestConfiguration(adUnitID: "demo-native-app-yandex")
adLoader.loadAd(with: requestConfiguration)
}
private func bindNativeAd(_ ad: NativeAd){
ad.delegate = self
do{
try ad.bind(with: adView)
} catch{
// ...
}
}
private func setupUI(){
// ...
}
}
extension NativeCustomViewController: NativeAdLoaderDelegate{
func nativeAdLoader(_ loader: NativeAdLoader, didLoad ad: NativeAd){
bindNativeAd(ad)
}
func nativeAdLoader(_ loader: NativeAdLoader, didFailLoadingWithError error: Error){
// ...
}
}
```
## Loading multiple ads {#load-more-ads}
The Yandex Mobile Ads SDK provides the option to load multiple ads in a single request (up to nine ads).
{% note info %}
Use the `demo-native-bulk-yandex` demo ad unit for your `AdUnitID`. For supported platforms, see [Demo ad units for testing](https://boost.yandex.ru/doc/en/ad-monetization/dev/ios7/demo-blocks.md).
{% endnote %}
1. Create an instance of the `NativeBulkAdLoader` class to get native ads.
2. Create a configuration for the `nativeAdRequestConfiguration` request using the `NativeAdRequestConfiguration` class. In request parameters, you can pass ad unit ID, image loading method, age, gender attributes, and other data that can make impressions more relevant.
3. Set a delegate for retrieving ads that implements the `NativeBulkAdLoaderDelegate` protocol.
4. To track the ad loading process, implement the `NativeBulkAdLoaderDelegate:` protocol methods: `-nativeBulkAdLoader:didLoadAds:` and `-nativeBulkAdLoader:didFailLoadingWithError:`.
5. Send the request configuration and the number of requested ads (`adsCount` parameter) to the loader.
```swift
// Creating a request configuration
let requestConfiguration = MutableNativeAdRequestConfiguration(adUnitID: AdUnitID)
// Creating a loaderad
Loader = NativeBulkAdLoader()
adLoader.delegate = self
// Passing the request configuration and the number of requested ads to the loader
adLoader.loadAds(with: requestConfiguration, adsCount: adsCount)
// Implementing delegate methods
func nativeBulkAdLoader(_ nativeBulkAdLoader: NativeBulkAdLoader, didLoad ads: [NativeAd]) {
// ..
// Processing each object with the id separately
}
```
{% note info %}
Using a bulk ad request, you can select multiple distinct ads.
The array of ads returned by a bulk request may contain between zero and `adsCount` `NativeAd` objects. All the received ad objects can be displayed independently, using the previously described methods for native ad layout.
{% endnote %}
## Testing native ad integration {#test}
### Using demo ad units for ad testing {#demo-blocks}
Use test ads to check your native ad integration and the app itself.
To make sure that test ads are returned for each ad request, we created a special demo ad placement ID designed to help you test your ad integration.
Demo adUnitId for Combinatorial ads: `demo-native-content-yandex`.
Demo adUnitId for ads for mobile apps: `demo-native-app-yandex`.
{% note warning %}
Before publishing your app in the store, make sure to replace the demo placement ID with the real ID you obtained in the interface Boost.
{% endnote %}
### Testing ad integration {#test-int}
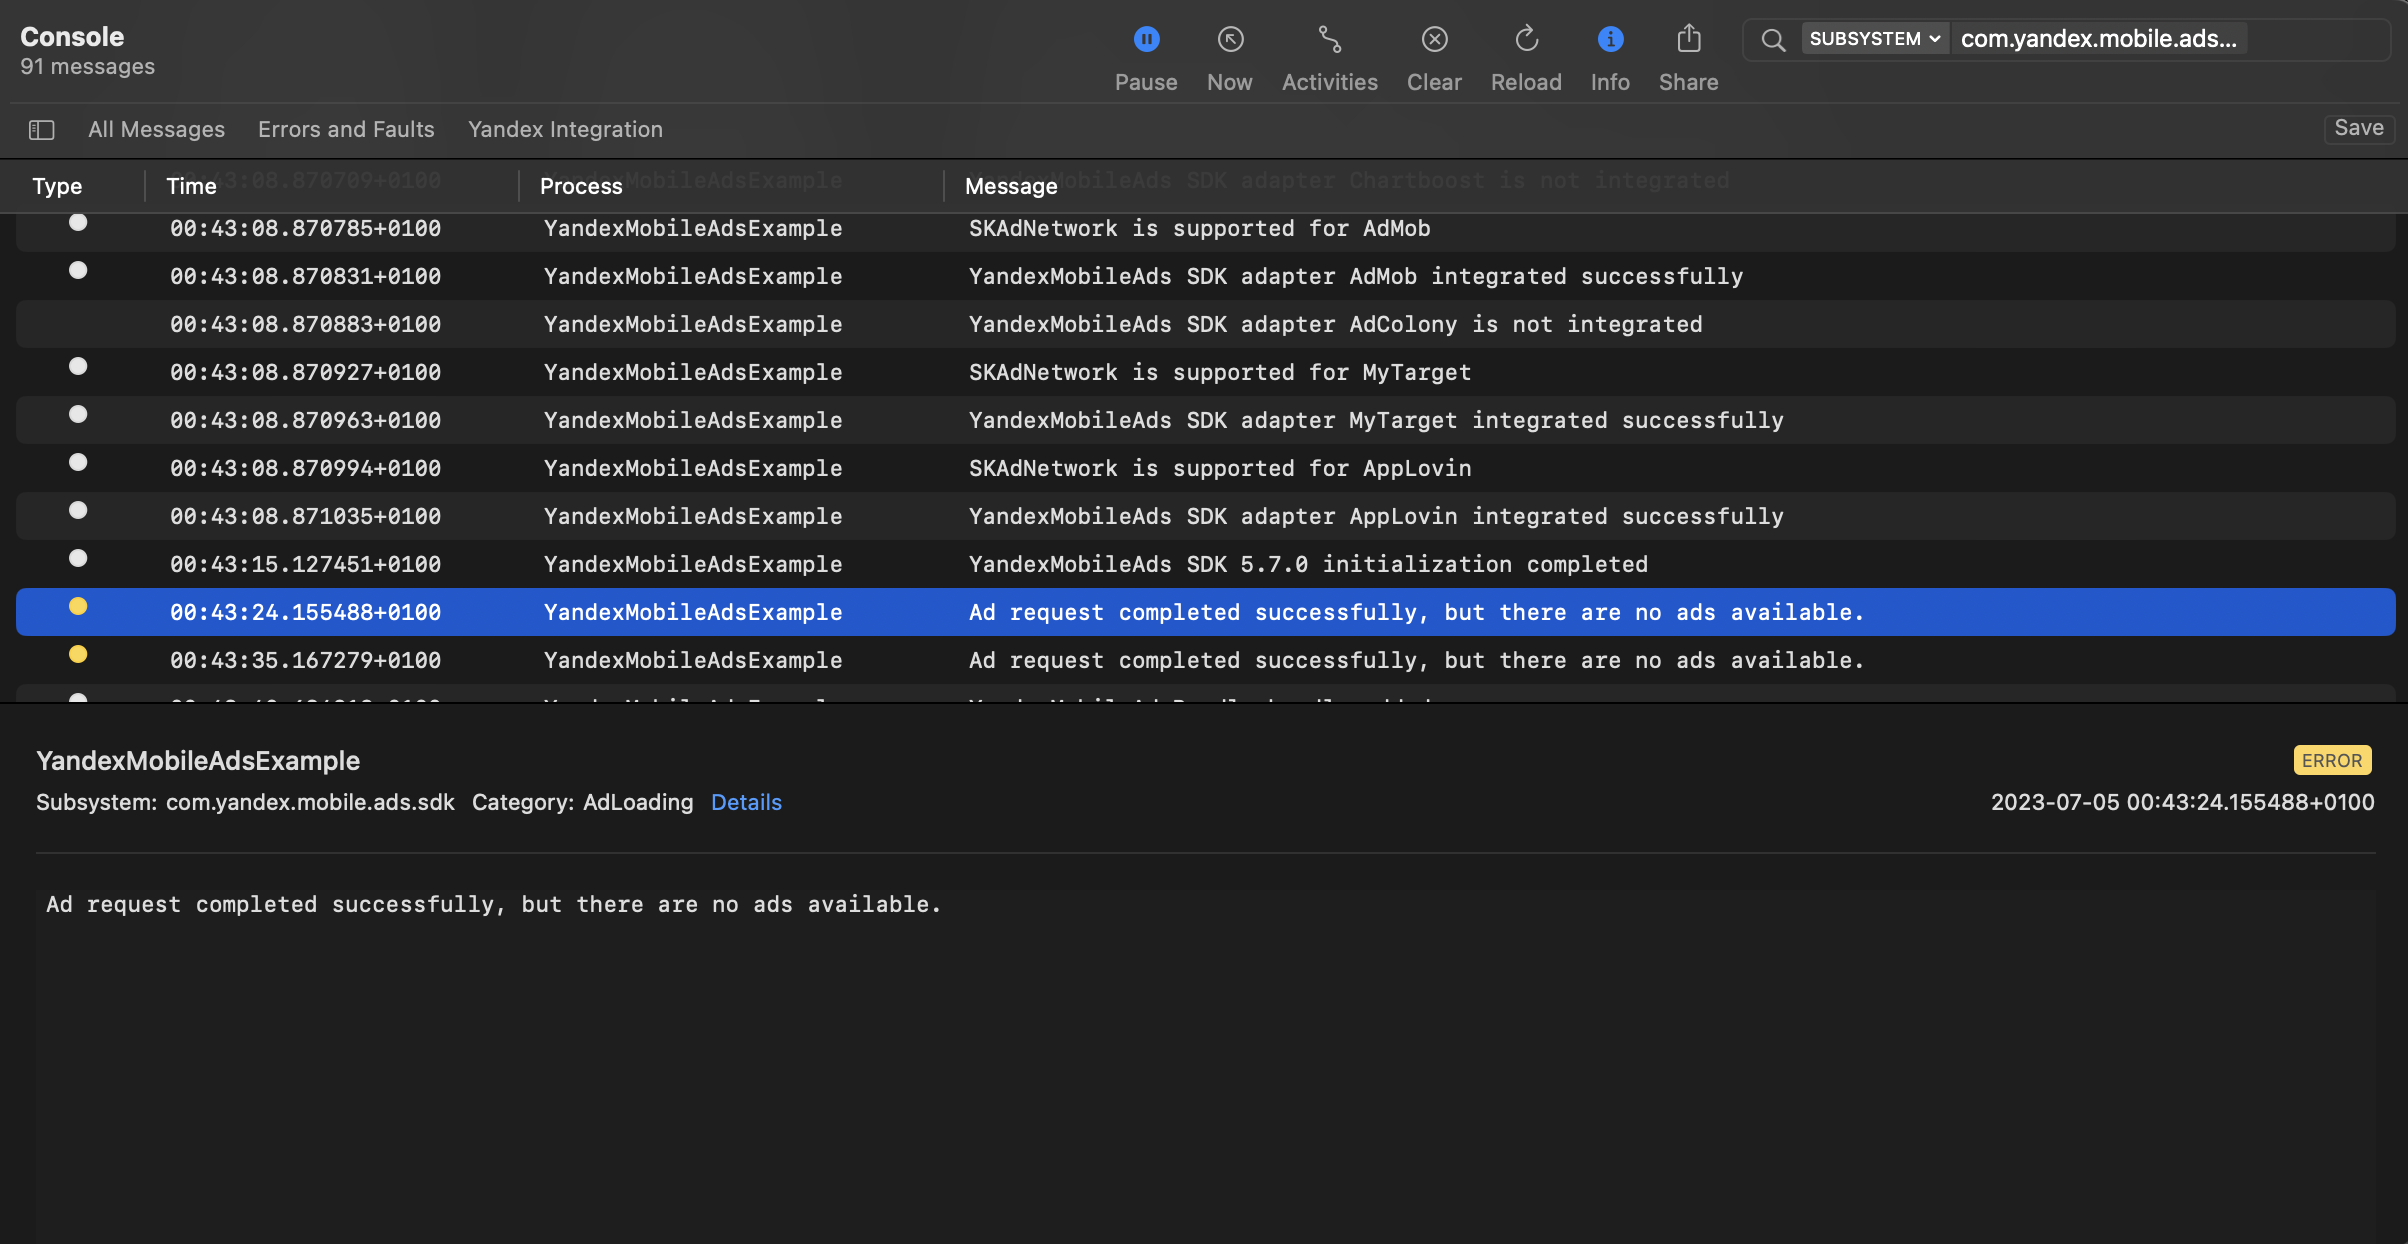
You can test your ad integration using the native Console tool.
To view detailed logs, call the `MobileAds` class's `enableLogging` method.
```swift
MobileAds.enableLogging()
```
To view SDK logs, go to the Console tool and set `Subsystem = com.mobile.ads.ads.sdk`. You can also filter logs by category and error level.
If you're having problems integrating ads, you'll get a detailed report on the issues and recommendations for how to fix them.
{% endcut %}
This guide will show how to integrate native ads into iOS apps. Besides code samples and instructions, it contains format-specific recommendations and links to additional resources.
## Prerequisite {#pre}
1. Follow the SDK integration steps described under [Quick start](https://boost.yandex.ru/doc/en/ad-monetization/dev/ios7/quick-start.md).
2. First, you need to [initialize](https://boost.yandex.ru/doc/en/ad-monetization/dev/ios7/quick-start.md#init) the advertising SDK.
3. Make sure you're using the [latest version of the Yandex Mobile Ads SDK](https://boost.yandex.ru/doc/en/ad-monetization/dev/platforms.md), and if you're using mediation, update to the most recent version of the [unified build](https://boost.yandex.ru/doc/en/ad-monetization/dev/platforms.md).
## Implementation {#implement}
Key steps for integrating native ads:
- Create and configure a `NativeAdLoader`.
- Set up a delegate for the loader and implement the required delegate methods.
- Load the ad.
- Pass [additional settings](https://boost.yandex.ru/doc/en/ad-monetization/dev/ios7/target-adfox.md) if you're using Adfox.
- Render the loaded ad.
## Specifics of native ad integration {#features}
1. All calls to Yandex Mobile Ads SDK methods must be made from the main thread.
2. We strongly advise against attempting to load a new ad when receiving an error in the `func nativeAdLoader(_ loader: NativeAdLoader, didFailLoadingWithError error: Error)` method. If you need to load an ad from `func nativeAdLoader(_ loader: NativeAdLoader, didFailLoadingWithError error: Error)`, restrict ad load retries to avoid recurring failed ad requests due to network connection constraints.
3. We recommend maintaining a strong reference to the ad and its loader throughout the lifespan of the screen where the ad interaction is taking place.
4. The size of the ad container should be based on the ad content.
After the ad has finished loading, you need to render all of its assets. You can get the list of available ad assets from the `NativeAd` advertising object.
5. Ads with a video typically have a higher CTR and, consequently, generate more revenue. To display video ads, the size of the ad container and the MediaView component must be at least 300 × 160 dp (density-independent pixels).
6. We recommend using a layout that includes all the possible components. In practical terms, such layouts result in higher conversion rates.
## Loading ads {#load}
To load your native ads, create a `NativeAdLoader` object.
Ad request parameters are configured using the `NativeAdRequestConfiguration` class object. Be sure to pass the ad unit ID as the request parameter. Additionally, you can configure the image loading method, age, gender attributes, and other data that can make impressions more relevant. To learn more, see [Ad targeting](https://boost.yandex.ru/doc/en/ad-monetization/dev/ios7/target.md).
To receive notifications about ad loading results, implement the `NativeAdLoaderDelegate` protocol and set it as a delegate for the previously created `NativeAdLoader`.
To load an ad, call the `loadAd(with: NativeAdRequestConfiguration)` method.
The following example shows how to load native ads from the View Controller:
```swift
final class CustomNativeViewController: UIViewController {
private var adLoader: NativeAdLoader?
override func viewDidLoad() {
adLoader = NativeAdLoader()
adLoader?.delegate = self
}
private func loadNativeAd() {
let requestConfiguration = NativeAdRequestConfiguration(adUnitID: "R-M-XXXXX-YY")
adLoader?.loadAd(with: requestConfiguration)
}
}
extension CustomNativeViewController: NativeAdLoaderDelegate {
func nativeAdLoader(_ loader: NativeAdLoader, didLoad ad: NativeAd) {
// Notifies that a native ad is loaded
}
func nativeAdLoader(_ loader: NativeAdLoader, didFailLoadingWithError error: Error) {
// Notifies that the ad failed to load
}
}
```
## Rendering ads {#ad-view}
After the ad has finished loading, you need to render all of its assets. You can get the list of available ad assets from the `NativeAd` advertising object.
There are two ways to configure the layout of an ad:
- Template-based layout.
- Manual configuration of the native ad layout.
### Layout using a template {#with-template}
The standard template layout is the simplest way to work with native ads, and you'll only need a few lines of code to set up the basic variant.
The template already includes a full set of necessary ad assets and defines their relative placement. The template is compatible with any supported type of native ads.
```swift
final class NativeTemplateViewController: UIViewController, NativeAdDelegate {
private let adView = NativeBannerView()
// ...
private lazy var adLoader: NativeAdLoader = {
let adLoader = NativeAdLoader()
adLoader.delegate = self
return adLoader
}()
override func viewDidLoad() {
setupUI()
loadNativeAd()
}
private func loadNativeAd() {
let requestConfiguration = NativeAdRequestConfiguration(adUnitID: "demo-native-content-yandex")
adLoader.loadAd(with: requestConfiguration)
}
private func bindNativeAd(_ ad: NativeAd) {
ad.delegate = self
adView.ad = ad
}
private func setupUI() {
// ...
}
}
extension NativeTemplateViewController: NativeAdLoaderDelegate {
func nativeAdLoader(_ loader: NativeAdLoader, didLoad ad: NativeAd) {
bindNativeAd(ad)
}
func nativeAdLoader(_ loader: NativeAdLoader, didFailLoadingWithError error: Error) {
// ...
}
}
```
The native ad template can be customized. To learn more about this, see [Setting up the layout using a template](https://boost.yandex.ru/doc/en/ad-monetization/dev/ios7/template.md).
### Manual configuration of the native ad layout {#config}
If the template fails to meet your needs, you can configure the layout of your native ads manually.
This method allows you to create a custom layout for your native ads and define their positioning relative to each other. The ad may include both required and optional assets for display. For the full list, see [Native ad assets](https://boost.yandex.ru/doc/en/ad-monetization/dev/ios7/components.md).
{% note tip %}
We recommend using a layout that includes all the possible components. In practical terms, such layouts result in a higher conversion rate.
{% endnote %}
To manually configure the layout of your native ads:
1. Create a custom `view` for the `YMANativeAdView` class.
1. Set up the positioning of custom elements responsible for asset rendering.
1. Bind these custom elements to the corresponding `YMANativeAdView` properties:
```swift
final class CustomNativeAdView: YMANativeAdView {
// ...
init(){
super.init(frame: CGRect())
setupUI()
bindAssets()
}
private func bindAssets(){
titleLabel = customTitleLabel
domainLabel = customDomainLabel
warningLabel = customWarningLabel
sponsoredLabel = customSponsoredLabel
feedbackButton = customFeedbackButton
callToActionButton = customCallToActionButton
mediaView = customMediaView
priceLabel = customPriceLabel
reviewCountLabel = customReviewCountLabel
ratingView = customRatingView
bodyLabel = customBodyLabel
iconImageView = customIconImageView
}
private func setupUI(){
// ...
}
}
```
{% note info %}
If you don't bind the custom element to the `YMANativeAdView` property for a required asset, the ad won't be displayed.
{% endnote %}
1. Link the custom `view` to the `NativeAd` ad object to display native ads in the `nativeAdLoader(_ loader: NativeAdLoader, didLoad ad: NativeAd)` method of the `NativeAdLoaderDelegate` delegate. To do this, call the `bind(with adView: YMANativeAdView)` method for the `NativeAd` object:
```swift
final class NativeCustomViewController: UIViewController, NativeAdDelegate {
private let adView = NativeCustomAdView()
// ...
private lazy var adLoader: NativeAdLoader ={
let adLoader = NativeAdLoader()
adLoader.delegate = self
return adLoader
}()
override func viewDidLoad(){
super.viewDidLoad()
setupUI()
loadNativeAd()
}
private func loadNativeAd(){
let requestConfiguration = NativeAdRequestConfiguration(adUnitID: "demo-native-app-yandex")
adLoader.loadAd(with: requestConfiguration)
}
private func bindNativeAd(_ ad: NativeAd){
ad.delegate = self
do{
try ad.bind(with: adView)
} catch{
// ...
}
}
private func setupUI(){
// ...
}
}
extension NativeCustomViewController: NativeAdLoaderDelegate{
func nativeAdLoader(_ loader: NativeAdLoader, didLoad ad: NativeAd){
bindNativeAd(ad)
}
func nativeAdLoader(_ loader: NativeAdLoader, didFailLoadingWithError error: Error){
// ...
}
}
```
## Loading multiple ads {#load-more-ads}
The Yandex Mobile Ads SDK provides the option to load multiple ads in a single request (up to nine ads).
{% note info %}
Use the `demo-native-bulk-yandex` demo ad unit for your `AdUnitID`. For supported platforms, see [Demo ad units for testing](https://boost.yandex.ru/doc/en/ad-monetization/dev/ios7/demo-blocks.md).
{% endnote %}
1. Create an instance of the `NativeBulkAdLoader` class to get native ads.
2. Create a configuration for the `nativeAdRequestConfiguration` request using the `NativeAdRequestConfiguration` class. In request parameters, you can pass ad unit ID, image loading method, age, gender attributes, and other data that can make impressions more relevant.
3. Set a delegate for retrieving ads that implements the `NativeBulkAdLoaderDelegate` protocol.
4. To track the ad loading process, implement the `NativeBulkAdLoaderDelegate:` protocol methods: `-nativeBulkAdLoader:didLoadAds:` and `-nativeBulkAdLoader:didFailLoadingWithError:`.
5. Send the request configuration and the number of requested ads (`adsCount` parameter) to the loader.
```swift
// Creating a request configuration
let requestConfiguration = MutableNativeAdRequestConfiguration(adUnitID: AdUnitID)
// Creating a loaderad
Loader = NativeBulkAdLoader()
adLoader.delegate = self
// Passing the request configuration and the number of requested ads to the loader
adLoader.loadAds(with: requestConfiguration, adsCount: adsCount)
// Implementing delegate methods
func nativeBulkAdLoader(_ nativeBulkAdLoader: NativeBulkAdLoader, didLoad ads: [NativeAd]) {
// ..
// Processing each object with the id separately
}
```
{% note info %}
Using a bulk ad request, you can select multiple distinct ads.
The array of ads returned by a bulk request may contain between zero and `adsCount` `NativeAd` objects. All the received ad objects can be displayed independently, using the previously described methods for native ad layout.
{% endnote %}
## Testing native ad integration {#test}
### Using demo ad units for ad testing {#demo-blocks}
Use test ads to check your native ad integration and the app itself.
To make sure that test ads are returned for each ad request, we created a special demo ad placement ID designed to help you test your ad integration.
Demo adUnitId for Combinatorial ads: `demo-native-content-yandex`.
Demo adUnitId for ads for mobile apps: `demo-native-app-yandex`.
{% note warning %}
Before publishing your app in the store, make sure to replace the demo placement ID with the real ID you obtained in the interface Boost.
{% endnote %}
### Testing ad integration {#test-int}
You can test your ad integration using the native Console tool.
To view detailed logs, call the `MobileAds` class's `enableLogging` method.
```swift
MobileAds.enableLogging()
```
To view SDK logs, go to the Console tool and set `Subsystem = com.mobile.ads.ads.sdk`. You can also filter logs by category and error level.
If you're having problems integrating ads, you'll get a detailed report on the issues and recommendations for how to fix them.
 ## Indicator of correct native ad integration {#native-ad-integration-indicator}
{% note info %}
By default, the indicator is only shown in simulator mode (device type `DeviceTypeSimulator`). You can view device types in `DeviceType`.
{% endnote %}
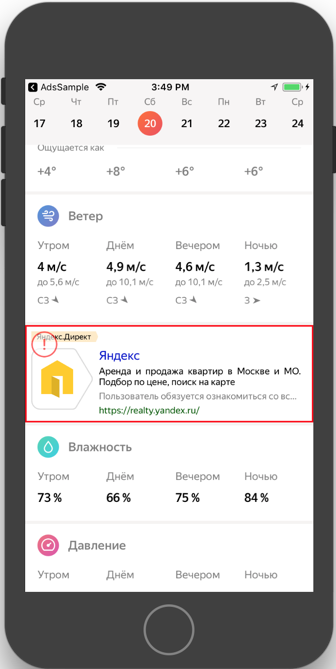
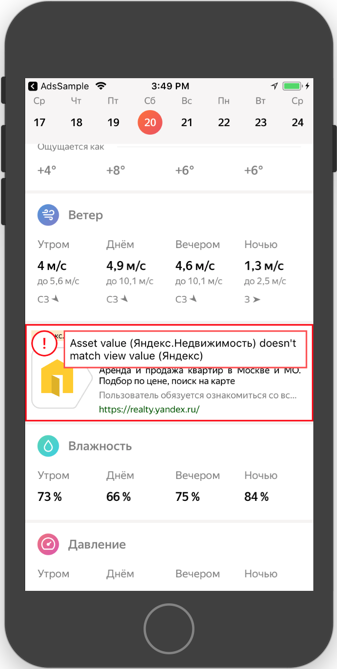
If there's an error in native ad integration, the indicator will appear over the ad in the simulator mode. Click the indicator to see the debug message, which should point you to the root cause of the problem. Clicking the indicator again hides the message.
To enable the indicator for real devices as well, pass the value `DeviceTypeHardware | DeviceTypeSimulator` in the `enableVisibilityErrorIndicatorForDeviceType:` method.
```swift
MobileAds.enableVisibilityErrorIndicator(for: [.hardware, .simulator])
```
To disable the indicator, pass the value `DeviceTypeNone` in the `enableVisibilityErrorIndicatorForDeviceType:` method.
```swift
MobileAds.enableVisibilityErrorIndicator(for: [])
```
#|
||
## Indicator of correct native ad integration {#native-ad-integration-indicator}
{% note info %}
By default, the indicator is only shown in simulator mode (device type `DeviceTypeSimulator`). You can view device types in `DeviceType`.
{% endnote %}
If there's an error in native ad integration, the indicator will appear over the ad in the simulator mode. Click the indicator to see the debug message, which should point you to the root cause of the problem. Clicking the indicator again hides the message.
To enable the indicator for real devices as well, pass the value `DeviceTypeHardware | DeviceTypeSimulator` in the `enableVisibilityErrorIndicatorForDeviceType:` method.
```swift
MobileAds.enableVisibilityErrorIndicator(for: [.hardware, .simulator])
```
To disable the indicator, pass the value `DeviceTypeNone` in the `enableVisibilityErrorIndicatorForDeviceType:` method.
```swift
MobileAds.enableVisibilityErrorIndicator(for: [])
```
#|
||  |
|  ||
|#
## Additional resources {#resources}
*
Link to [GitHub](https://github.com/yandexmobile/yandex-ads-sdk-ios).
||
|#
## Additional resources {#resources}
*
Link to [GitHub](https://github.com/yandexmobile/yandex-ads-sdk-ios).